
At 10KB, we have a hardware budget where everyone gets to decide what kind of stuff will make you enjoy your work more. As a non-developer, I don't particularly value a giga workstation or 35 computer screens side by side (and I already got to buy a beautiful laptop two years ago). As a nerd, I do value tech gadgets and that's how I discovered the 'mechanical keyboard' a few months ago.
Making your own custom keyboard: the possibilities of mechanical keyboards

Written by Linda
The hobby that preceded this
A while ago, over lunch, we were talking about different keyboard layouts. Whereas most of the world uses QWERTY, Raymond had taught himself Colemak: a keyboard layout where letters that are used many times in succession are actually next to each other. I decided (as a blind typing QWERTY user), to practise with this new layout in my spare hours. Conclusion: if you can already type blind, it is unnecessary effort to switch, but still I don't think I want to go back to QWERTY. 'Rolling' my fingers across the keys (which Colemak is known for) feels a whole lot more pleasant. Moreover, this first encounter also made me realise that I can simply adapt a layout to what I like, rather than how it 'should' be. Spoiler alert: there is not much left of the original Colemak layout.
The keyboard itself
I always thought (like 99% of humanity) that a keyboard is 'just' a keyboard. Within 10KB, I first saw variations on that normally. For example, Ted has a Moonlander and Robin has a Lily58. Both so-called 'split keyboards' consisting of two parts. Ideal for ergonomically placing both halves in front of your shoulders and you still have space in the middle for coffee and snacks. That seemed like something for me.
So many options
How many keys do you actually want on your keyboard? What key layout do you think is important (ortho linear or the standard staggered)? And then there is such a thing as a 'splayed' keyboard where keys are rotated at different angles. So do you want Cherry MX red switches, Kailh choc browns or go for a linear switch? RGB lights under your keys? What colour keys do you want at all? All questions I had never heard of or thought about at all in my life. Weeks of late-night research followed. Thankfully, there is a subReddit for exactly the keyboard fanatics who find these questions relevant.
The physical layout
After printing out a few different layouts (to see what suits my hands well), I found out fairly quickly that my left and right hands look completely different. For instance, the index finger of my right hand is a lot smaller than that of my left hand, while the little finger is again longer than its left sister. Now that I had ended up in the biggest nerd corner of the internet in ages anyway, I decided to crack on: then I would also 'just' design my own circuit board.
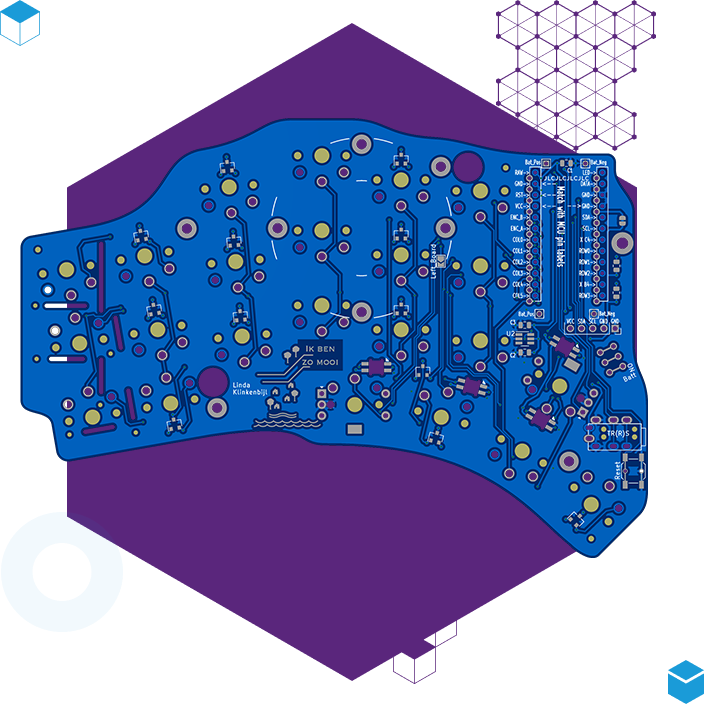
PCB design
YouTube will get you a long way and in a few days I learnt the basics of KiCad (a drawing programme for creating PCBs). I took some existing keyboards for inspiration and then made exactly the modifications that seemed ideal for my hands. It ended up with a layout of 46 buttons (23 on each hand) and I just hope that's enough (because then where do you leave your numbers?). At least it makes both halves nice and compact.

Soldering
I had never soldered before in my life. Fortunately, the Pippi Longstocking in me thinks that is helpful for 'thinking I should definitely be able to do that' and so, for a fortnight, my living room turned into a soldering station. The most tiny LEDs, microcontrollers (nice!nano), switches (kailh choc brown), LED displays (nice!view), reset buttons, TRRS ports and on/off switches were attached to both circuit boards like true monks' work.
To be fair, though, I must admit that I have since given up on the led lights. After re-soldering them three times, trying to replace them and, above all, crying a lot, I have come to the conclusion that "not having LEDs is better for battery life". Just so you know.
Forking, Cloning, Pushing and Flashing
The whole idea of these mechanical keyboards is that you can control everything yourself and just about every functionality is programmable. For that, all you have to do is a bit of programming and make sure the right software gets on the microcontrollers. In an online tutorial, I read this:
Fork this repo on GitHub, clone it locally, trigger a build by pushing a change, download the artifact and flash the UF2 files.
These are the moments when I am intensely grateful that I work at a software company. Flashing I still recognise, but I can't imagine I mean the same thing by that as this tutorial. Fortunately, Rick immediately understood what this says (and even had to chuckle a little), so that 15 minutes later my keyboard was functional. Flashing, by the way, apparently means something like 'putting a file on it', so it wasn't much more than connecting a cable to the keyboard and dragging a document onto it.
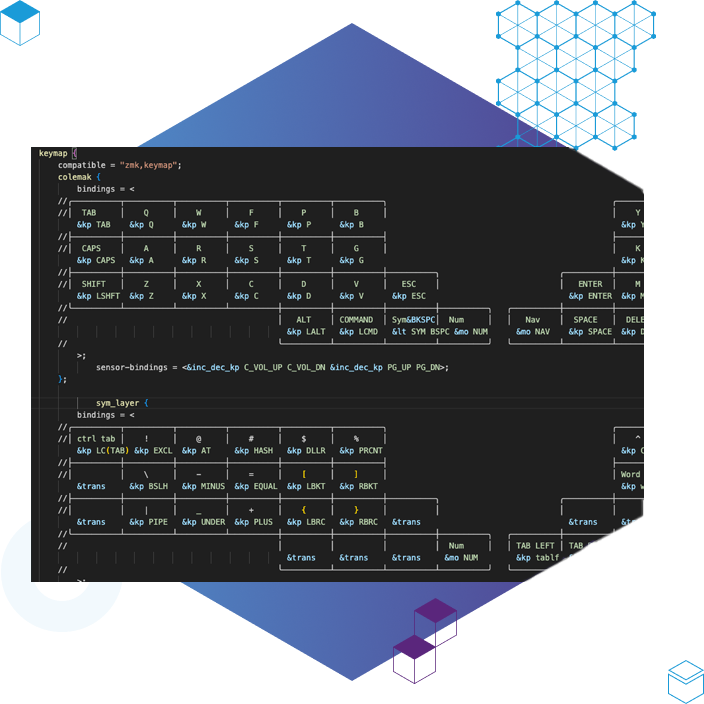
Custom keymap
Since my Colemak discovery, I was most looking forward to designing and programming the keymap.These kinds of keyboards work with 'layers', doubling the possibilities a thousandfold.Such a layer should be seen a bit like, say, the SHIFT button: normally all letters are lowercase, but when you press shift they become capitals. Or the CTRL button, which turns the 'c' into a 'copy' button. Besides layers, you can give different combinations of buttons a function, you can put whole pieces of text under a button (e.g. your e-mail address) and it is possible to give buttons dual functions based on 'short press' or 'hold down'.There are countless examples on Github of all the clever things people have come up with.If 'an expert' reads this who has a good tip for me, please do send me an email!
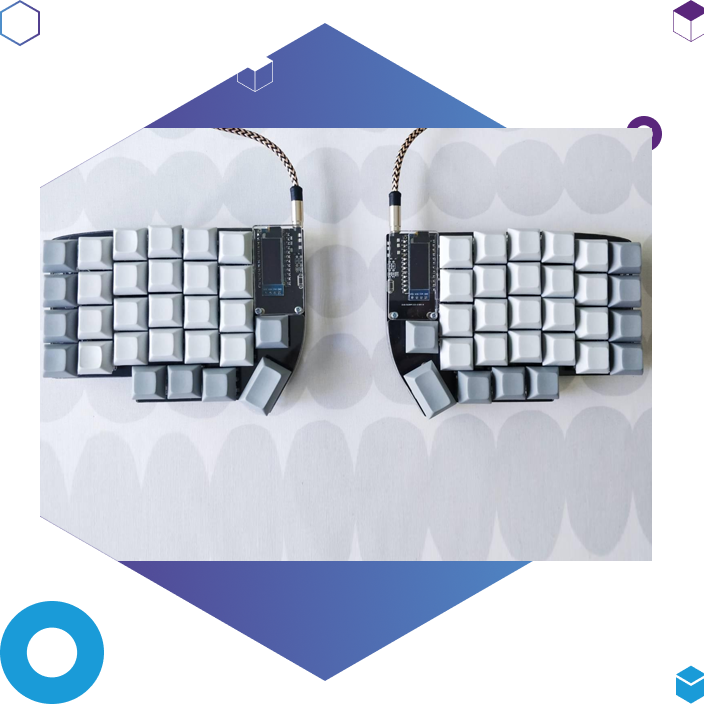
Finished? Now what?
This whole project consisted of a lot of waiting. Parts come from pretty much everywhere (although it turns out one of the most famous custom mechanical keyboard shops (splitkb) is in the Netherlands) and so came trickling in separately. When finally the keycaps came in last, my new keyboard was finished. I am super happy with the end result, but can't do much with it yet 🙈. I mainly have to get used to the new locations of the buttons. Over the past 20 years, I have typed in a certain way and muscle memory is proving to be a thing. I currently start my working day with the new keyboard, only to switch back to my 'old' keyboard after half an hour anyway. I wonder how long this learning period will last, although I typed this entire blog with the new keyboard which goes surprisingly well. A quick test on Monkeytype) tells me that I am typing at 56 words per minute by now anyway, so I am heading in the right direction.
Update after a week
Apparently that learning is not as much work as I thought beforehand. By now I am typing on the new keyboard without any problems and I am largely used to the location of the keys. For the symbols, I made a cheat sheet of the locations, but if locations don't feel logical they are easily adjusted. I actually find the lack of the row of numbers much nicer than I had thought. I have now opted for a numpad under a layer and that actually feels much more intuitive too. Downside to so few buttons: the arrow keys also have to be under a layer, which means you have to press a combination of keys for those by default and I'm not really used to that yet. As for the two halves of the keyboard, I am a MEGA fan. By placing both my hands quite far apart, your chest opens up and you automatically sit up straight. The so-called 'shrimp posture' is thus a thing of the past. I'm still going to see how I can minimise my mouse use; the fact that I still have to reach for it now feels like a huge violation of my rhythm (such a first world problem though).